How to get a home studio
I’m going to talk about how I got to my current at-home studio setup. This might resonate with you particularly if you’ve been practicing ceramics for a few months and are thinking about what the process could look like.
Everyone’s experiences are different, and thats okay! But to me, my journey kinda looked like this:
- Taking a pottery class at a community studio or school
- Taking 2+ pottery classes
- Getting a membership at a community studio
- Partially beginning to make things at home and firing offsite
- Full commitment to the home setup
(Note: there is an optional step 0 of watching that scene from the movie Ghost, or watching The Great Pottery Throw Down, but it is not necessary.)
Pottery classes
The first class
Classes at studios are great way to get integrated with the flow of ceramics. You can learn a lot in just a 6-8 week class. Clay and tools are usually provided but not always. After not doing any ceramics for 10+ years, I took a class when I lived in SF which helped me get back into the swing of things. After one class I was convinced I wanted to keep doing it, so I signed up for a second.
The second class and beyond
I took a second multi-week class immediately after the first one. This was a more intermediate course which challenges students to go beyond the beginner cylinder/bowl shapes. Along with the second class, I also had access to dedicated student studio hours every weekend. I booked up as many hours as I could (about half a day). After the second and third class, I began to feel some frustration around not having enough room to store my work. In a community studio environment, student work usually gets a small portion of shelf real estate. At this point, the desire to join a community studio was becoming more clear.
The community studio
After a brief hiatus to move out of state, I was really lucky to find out a new community studio had opened up just a short walk away from my new place. With this studio, I had 24/7 access and a 2 ft x 2 ft shelf that only belonged to me. This was a big upgrade! But, it also a big cost. You have to go to a community studio consistently for it to pay off, otherwise you can usually get the same value by just repeating classes.
I went about 2-3 days a week. Usually a day after work, half a day or more on the weekend, and maybe - depending on what projects I had going on, a third day after work. At a community studio, work usually is fired all together (though I’ve seen studios do member-only kiln firings). This means you’re on their schedule, which may or may not be a hindrance for you depending on how many kilns the studio has, how many students & members are enrolled, and how many studio techs there are. At this particular studio, I also had to pay for my own firings based on volume.
One aspect of the community studio that I absolutely loved though is seeing everyone else’s work and process. There’s a creative energy in a shared studio that can’t be replicated at home. This is what I miss most about being at a community studio.
About a little over a year though, I began getting the idea that I wanted to have access to more abilities to create more at home. This is because I had a lot of challenges with timing the drying of my pieces.
When you make something on the wheel, you let it dry for a bit before you can cut it off the bat its thrown on, and then you might have to wait a little more before you can come back and trim it. With the temperature fluctuations of the studio it was frustrating to time my arrival to the optimal level of dryness - in the summer I’d throw a piece on a Saturday, partially cover it, and it would be bone dry by Monday. Or in the winter I’d do the same thing, and the piece wouldn’t be dry enough to trim until the following weekend, even if I had covered it the same.
I wanted to keep a better eye on the timing of my pieces drying and started taking home pieces after throwing them while still wet on the bat. This was a process fraught with anxiety and I had several accidents along the way. I didn’t have the room in my work schedule to go to the studio and check on pieces every day. Then I thought, “what if I could just make what I want at home, and let it dry with under my own watch?”.
The semi-home studio
After doing some research and saving, I ended up buying a wheel. This is when it really settled in that I was getting serious about this. A wheel isn’t cheap! It was my first significant investment in ceramics. I was also renting an townhome at the time, and didn’t have a separate room to work in. So my wheel ended up in the unused second bathroom. This was the easiest area to keep isolated and clean. For wastewater, I did install a Gleco Trap under the bathroom sink, and took as many preventative measures as possible to prevent clay from going down the pipes.
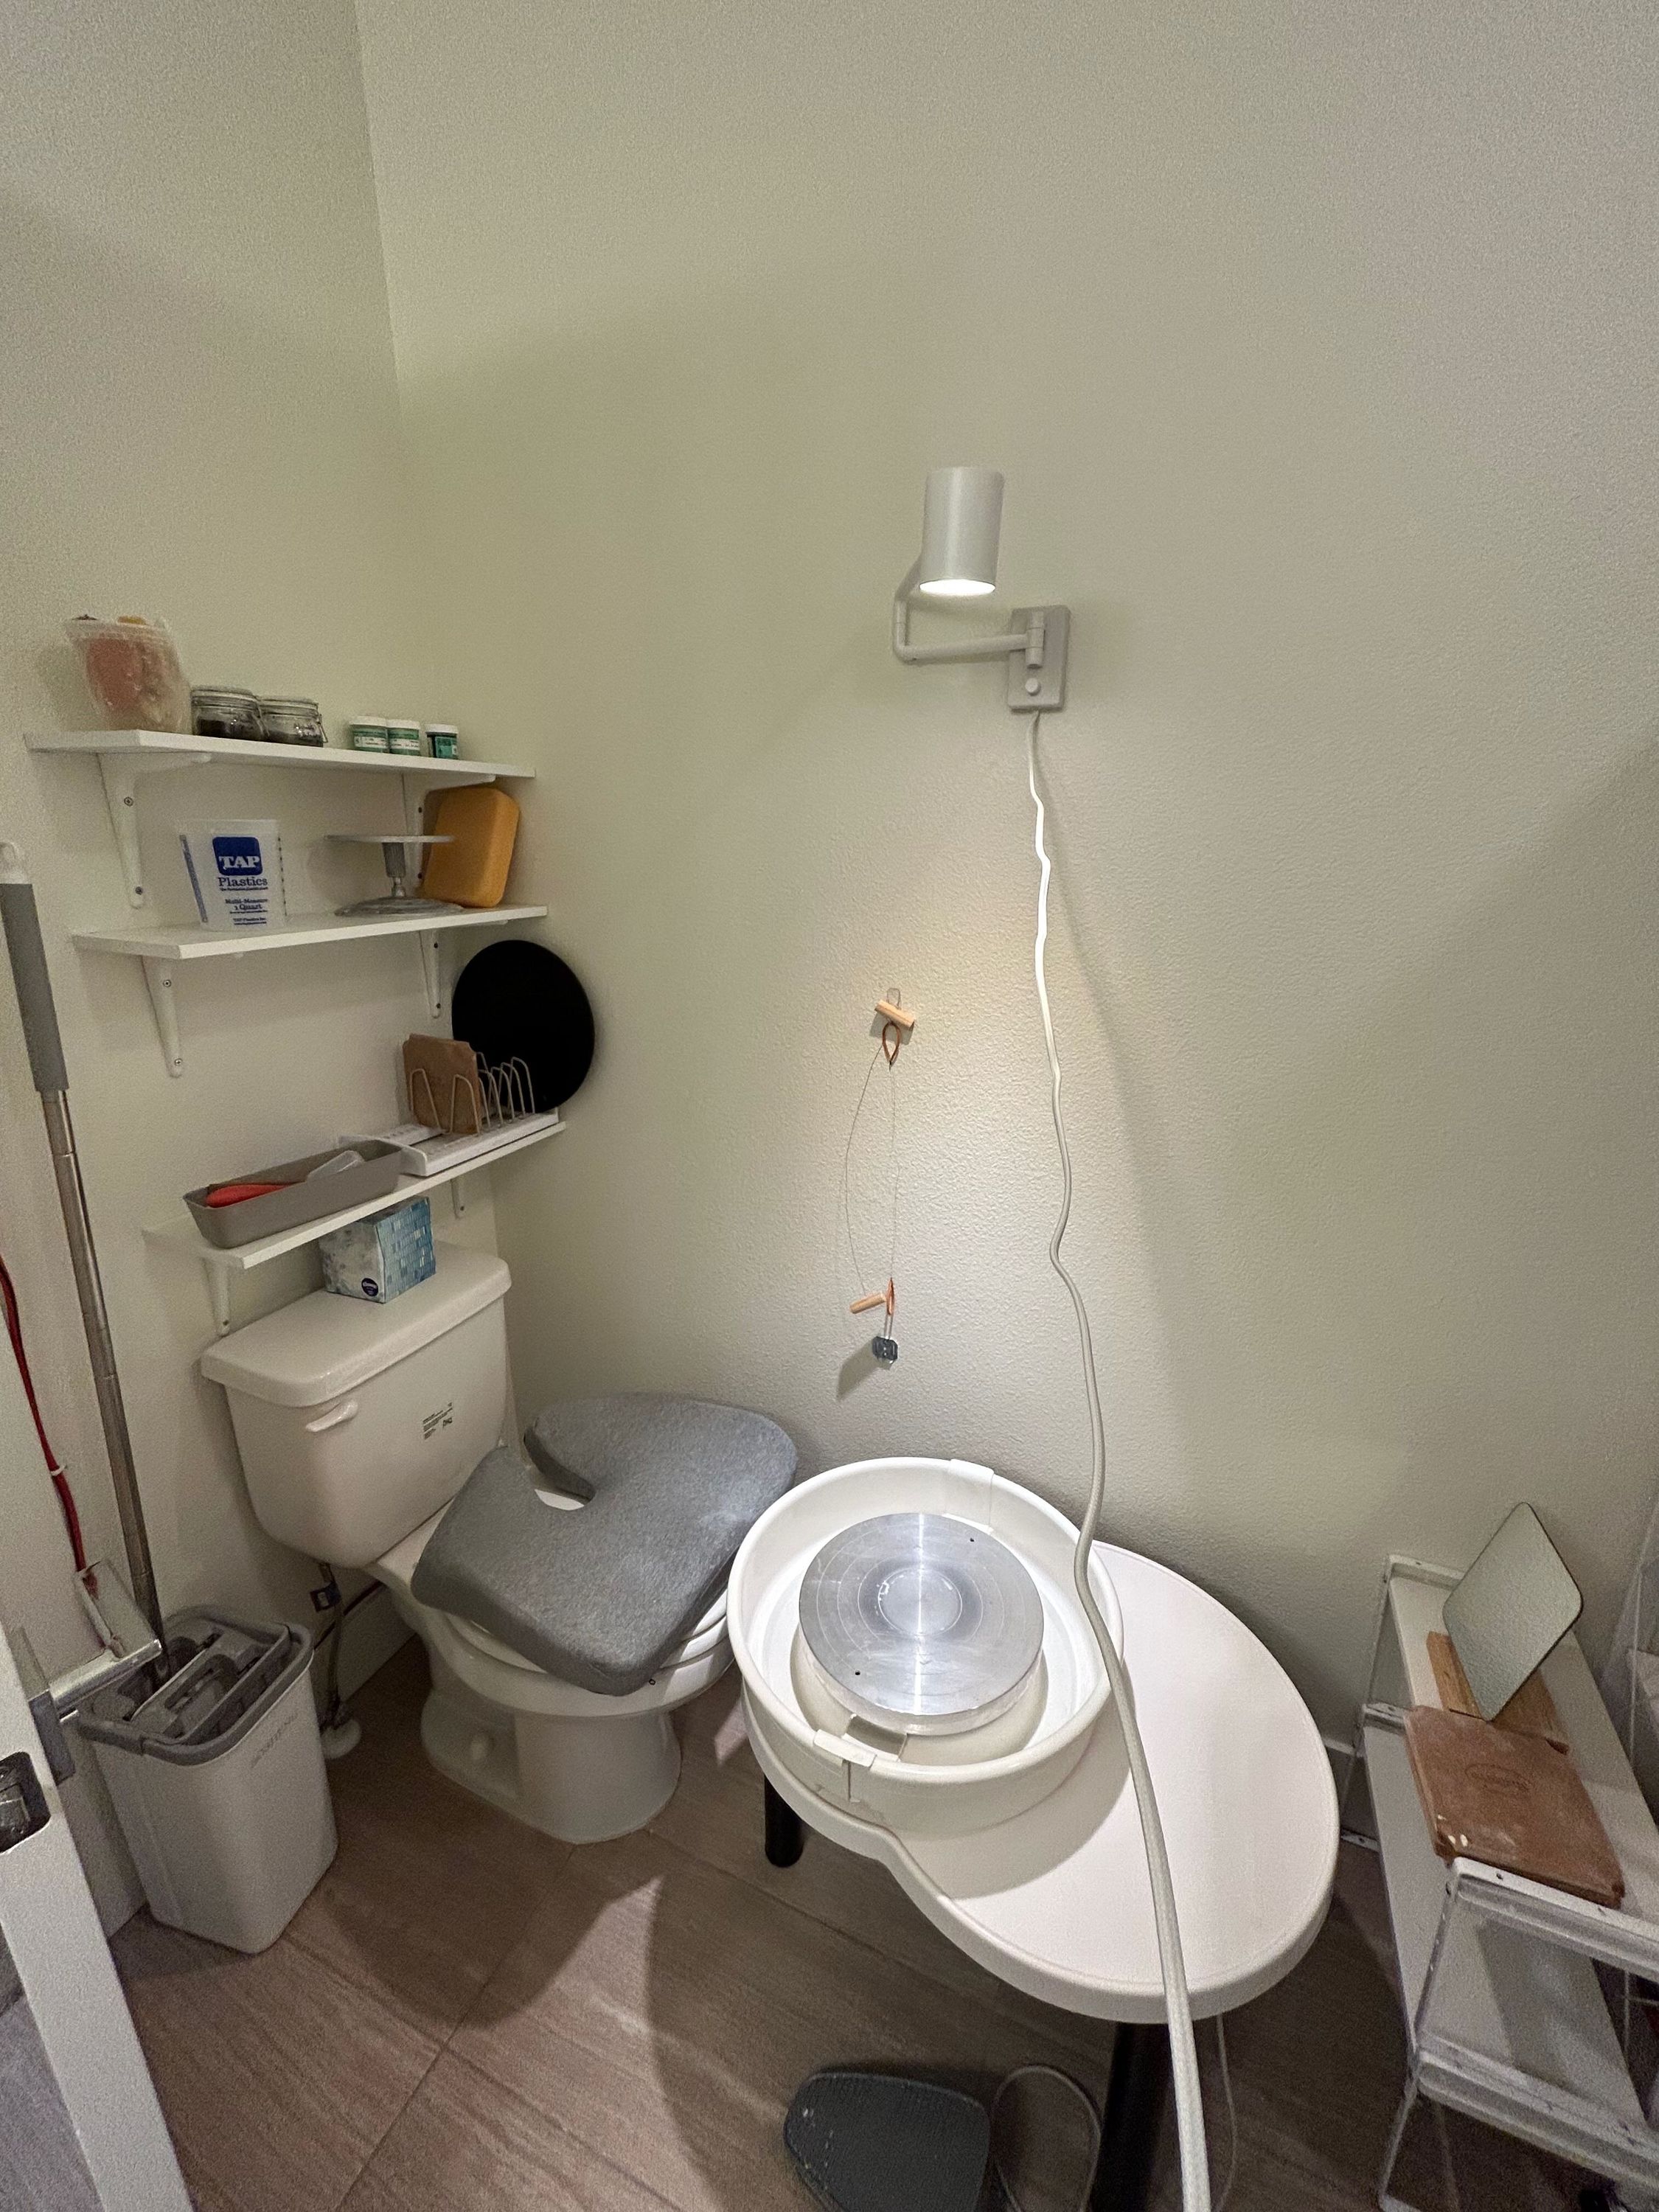 Ye Olde Potty Pottery
This setup gave me the ability to be super precise with my drying process. I could trim pieces and store them exactly at the right time, so nothing ever stayed too wet or got too dry. This was especially important when working with porcelain clays, since they needed to dry more slowly to prevent cracking.
When I finished pieces and as they became dry, I would very carefully bring them to the studio and fire them. And then, I got into a good creative groove. I was making a lot more because I had more room to store work. And I managed to sell a good amount of it as my studio’s bi-annual ceramic sales. I began glazing my pieces at home because I wanted to begin trying different glazes other than what the studio offered. To glaze at home with a very small workspace, that usually means just buying pre-made pints of glaze from commercial suppliers and brushing them on, not a method I preferred. I tried many glazes over a long time, but never felt like I found a glaze I “clicked” with and loved. Many pints of glaze were expensive, and I didn’t like being tied to a brand’s glaze that could be discontinued at any moment.
I began researching how to make glazes on my own, and realized how much cheaper it is to DIY. With perfect timing, I was also able to take an introductory glaze making workshop at another studio in town which helped demystify the process. This is something I was interesting in doing, but I did not have the space to make it happen.
Even if I could make my own glazes at home, every glaze had to be approved by the studio, and its possible they might not have allowed certain formulations to be fired. And I would only be limited to being able to fire a subset of glazes at cone 6, since this is what the studio fired its kilns at.
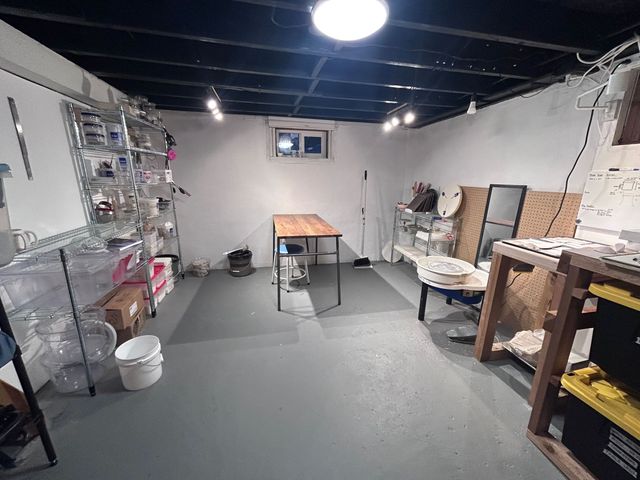
Full home studio
Seeing as my lease was up and I had already been thinking of moving into a bigger space for unrelated reasons (I worked remotely and wanted a little more space, a yard, etc.), the home searching process had more or less kicked off. In my home search process, one of the requirements was to have space to set up a larger workspace and have room for a kiln.
A very short time later I was under contract for a home The housing market’s post-Covid slump had just begun - so no 3% interest rate for me, but also, no bidding wars to be had either. While the home itself was a charming flip of questionable quality that caused a lot of financial pain later (too much for this forum), I was enamored with the idea of having a future kiln located in the external shed and a bigger workspace.
I had a bit of a setback financially a few months after moving in with home repair costs, but I was eventually able to rebound my savings and purchase a kiln later that year. I got a small Skutt kiln and installed it in the shed. Surprisingly, it was very easy to install something that can get up to 2200℉. The first firing was definitely scary, but it sent smoothly and now it’s just a part of my daily life.
Overall I’m really happy with my current setup. I have been reliably practicing ceramics for three years. Initially I had some concern that I would want to drop this hobby not too long after making my significant investments but that’s just something that didn’t become true. I now get to create in my own space on my own time, which is ultimately something that is so rewarding to me.
FAQ:
Will firing a kiln make my electric bill really expensive?
- Personally this isn’t been as big of an issue for me as I thought, but your total usage and local utility costs will vary. Skutt kilns have a neat feature where you can enter your local kWh cost, and after every firing it tells you how much each firing costs. I think as of right now a medium speed bisque to cone 04/glaze to cone 6 costs about $4.15 per firing for my KMT-818-3 in a Pacific Northwest. You can reduce these costs by investing in a kiln with thicker kiln brick (and hence better insulation). Skutt offers a 3” brick option that adds more cost, but will save energy because it is better insulated. In addition, if you live somewhere where your kWh prices changes dynamically based on demand, you can also try to align your firing during off-peak times, such as overnight.
Can I set up a home studio without running water?
- Yeah - I had originally done this. You will likely want to set up at least a 2 bucket wash approach where one bucket becomes the place to initially wash everything and the second bucket is where things will be rinsed clean once more. These will need to be cleaned and sanitized every so often, so you’ll want to make sure you have some space (preferably outside) to do this. If you want to reclaim the sludge from the first bucket, make sure you use a separate bucket for glaze rinsing. Otherwise the sludge should be dried out and thrown away every once in a while. Mia from Pottery to the People has a good video on this if you’re interested. On the flip side, there are also some ridiculously expensive self-contained water recirculation systems as well. But personally that doesn’t feel worth it to me.
Do I need any special electrical setups for a kiln?
- Probably. While there are very small test kilns that can plug into a standard outlet, you’ll likely wind up with something that requires an appliance plug on its own circuit breaker for safety. I had an electrician install this in the shed, and gave them a sheet with the electrical specs of the kiln to make sure we were on the same page, using this tool.
What other costs should I think about when planning a home studio?
- I spent a good amount on shelving - think about how you’re going to lay out your drying areas and where you will put tools, supplies, and pieces that are in flight. You should also consider the flooring where you plan to work - it should be easy to sweep and mop every time you work.
If you have any other questions about setting up a home studio, feel free to shoot me an email at hello@glazedays.art.
Sign up below to get updates about new posts & work!